

Your Braid Appointment Guide for a Polished Visit

A great braid appointment should feel clear before you ever sit in the chair. This braid appointment guide helps you choose a look that fits your life, prepare your hair with confidence, and know what to expect from arrival through the finished style. The goal is simple: neat, polished braids that feel like you.
Start With the Look You Want to Wear
The best style is not always the one that looks best in a single photo. Think about where you are headed in the next few weeks: work, school, travel, a special event, workouts, or a season when you want to spend less time styling your hair. Your braids should support your routine while giving you the presentation you want.
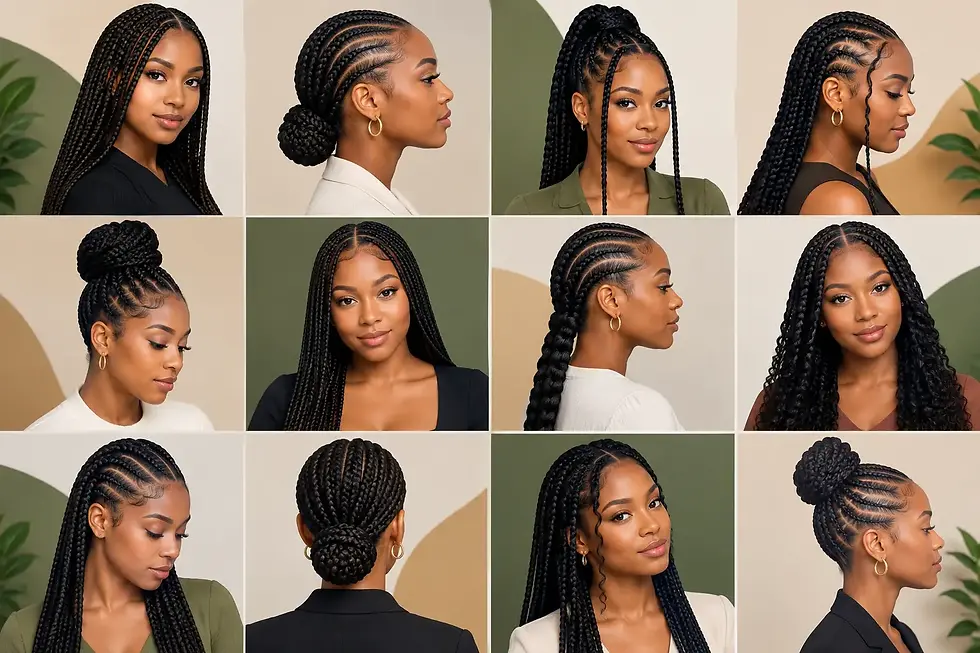
Traditional braids are a classic choice when you want a defined, consistent finish. They offer a timeless look with clean sections and can be styled in different sizes and lengths. Knotless braids create a lighter-looking start at the scalp and are a popular option for clients who want movement and a more flexible feel. The right choice depends on your preferred look, your hair goals, and the time you want to spend in the chair.
When you browse style photos, look beyond the overall length. Notice braid size, parting pattern, color, fullness, curled ends, and whether the style has loose pieces throughout. A photo gives your braider a useful visual reference, but it also starts a realistic conversation. Two styles may appear similar while requiring very different appointment times, materials, or maintenance.
If you love a softer, more textured finish, a human hair boho add-on can bring that extra detail to a braid style. It is a beautiful choice for clients who want an elevated boho look, though it comes with a trade-off: loose hair needs more gentle care than a classic all-braided finish. If low-maintenance is the priority, a clean traditional or knotless style may be the better fit.
Use This Braid Appointment Guide Before Booking
Booking the correct service protects your time and helps create the result you expect. Read each service description, check the listed price and appointment length, and select the closest match to the style you want. If you are deciding between two options, consider the finished look rather than choosing solely by price. A smaller braid size or added detail often means more time and precision.
Hair is included with core services, which removes one major step from your preparation. You can focus on choosing your style and arriving ready for service instead of trying to match extension hair on your own. If you have a specific color preference, length request, or add-on in mind, make sure it is reflected in the service selection or appointment details.
Appointment-only service is designed to keep the experience focused. Your reserved time is for you, not a walk-in queue. Booking online also makes it easier to choose an appointment that works around a full week. Early morning, late-night, and weekend availability can be especially helpful when a weekday salon visit is hard to fit between work, classes, family responsibilities, or travel.
Before confirming, pause and review the date, start time, selected style, and any notes you have added. That small check can prevent confusion later and gives your braider the clearest picture of the service you are coming in for.
Prepare Your Hair for a Better Appointment
Clean hair and a clean scalp make a difference in comfort and finish. Arrive with your hair washed, fully detangled, and free of heavy buildup unless your booked service instructions say otherwise. Hair that is still damp, tightly matted, or coated with oils and products can add time and make the appointment less comfortable.
Preparation does not need to become complicated. A simple wash, conditioner, and thorough detangle are usually the foundation. Let your hair dry completely, especially at the roots. If your hair tangles easily, take extra time to work through the ends before your appointment. This helps the braiding process begin smoothly and allows more time to stay focused on clean parts and consistent braids.
Bring only what adds value to your visit. A reference photo is helpful, particularly if it shows the braid size, length, and finish you want. If you prefer a certain part placement or have a concern about sensitivity in one area, mention it at the beginning. Clear communication is part of quality service, and it is easier to adjust expectations before the braiding starts than halfway through the appointment.
It also helps to plan for your comfort. Braiding appointments can take several hours depending on the selected style. Eat beforehand, bring water if you like, and dress comfortably. If you are coming from work or heading somewhere afterward, choose an outfit that is easy to change without disturbing fresh braids.
What Quality and Precision Look Like in the Chair
A polished braid style starts with the foundation. Clean parts, balanced sections, and a consistent pattern make the finished look feel intentional from every angle. These details are not just for the mirror on appointment day. They influence how the style settles, how easily it can be styled, and how polished it looks as you wear it.
Comfort matters, too. Protective styling should not mean ignoring pain. Some tension can be expected while hair is being secured, but sharp pain, burning, headache-level discomfort, or excessive pulling should be addressed right away. Speak up early. A client-centered appointment leaves room for communication so your braider can respond before discomfort becomes a bigger issue.
Be open to professional guidance if the exact image you saved is not the best match for your hair condition, timing, or desired upkeep. Sometimes the better choice is a slightly larger braid size, a different length, or a simpler finish that still gives you the same overall confidence. That is not settling. It is choosing a style that can look good beyond the first day.
Plan for the First Few Days After Your Appointment
Fresh braids often need a little time to settle. Keep your scalp comfortable, avoid immediately pulling the hair into tight ponytails, and give the finished look space to fall naturally. If you chose a boho add-on, be particularly gentle with the loose hair and avoid rough brushing or frequent handling.
At night, protect your braids with a satin or silk scarf, bonnet, or pillowcase. This helps reduce friction and keeps the style looking smoother. During the day, a light scalp-friendly product may be useful when needed, but heavy product buildup can take away from the clean finish. Keep your routine simple and pay attention to how your scalp feels.
How long you wear your braids depends on the style, your hair growth, your maintenance routine, and your scalp. The goal is not to stretch a style as long as possible. The goal is to enjoy it while it still looks polished and feels comfortable. When braids begin to feel overly loose, tangled at the root, or difficult to manage, it may be time to plan your next appointment.
Make the Appointment Work for Your Schedule
For clients across Torrance, the South Bay, and greater Los Angeles, convenience is part of the service. A braid appointment can be a reset before a busy stretch at work, a vacation-ready style, or simply time set aside for yourself. Choosing a slot that gives you room to relax makes the experience better than trying to squeeze it into an already overbooked day.
Traditional Braids is built around that practical need for flexibility, with appointment times that can work early, late, and on weekends. Browse the available styles, select the look that fits your plans, and reserve your time online. A clear booking process lets you focus on the part that matters most: walking out with a style that feels neat, confident, and ready for whatever is next.
Your next braid appointment does not need to feel like a guessing game. Choose a style you can realistically maintain, arrive prepared, communicate what matters to you, and let quality, precision, and attention to detail carry the finished look.


Comments